We will create a bootable USB stick with Linux by starting from a Linux distribution’s ISO. Since we want to create a USB stick that will be able to boot a UEFI system, we will require an ISO that can do this. The ISO requires a special EFI bootloader. At the time of writing this article, not many Linux distributions had an ISO available that contains the special EFI bootloader. We have been looking at Debian and Kali, but both ISO’s were lacking this feature.
We did find that the Ubuntu ISO contained the bootloader that we needed. We have used the following ISO “ubuntu-14.04.2-desktop-amd64.iso”. Make sure that you download the AMD64 version of the ISO! You can download this ISO from the following link: http://www.ubuntu.com/download/desktop
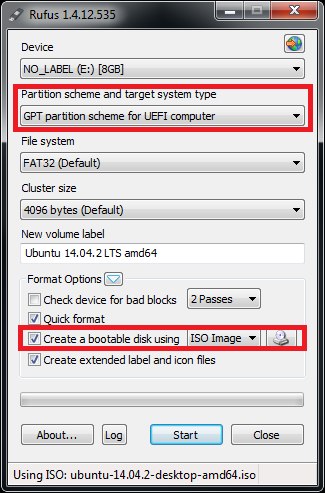
To create the bootable USB stick from the ISO, we use the Rufus tool on Windows. You can download Rufus via the following link: http://rufus.akeo.ie/
Use Rufus as follows:
- Set “Partition scheme and target system type” to “GPT partition scheme for UEFI computer”.
- Set “File system” to “FAT32 (default)”
- Set “Cluster size” to “4096 bytes (default)”
- Select “Create a bootable disk using ISO”
- Select the Ubuntu ISO.
- Make sure that Rufus hasn’t changed the partitioning scheme after you have selected the ISO.
When Rufus is ready with your stick, you will have a stick with a UEFI bootloader. Booting a machine with this stick allows you to boot an Ubuntu live session so that you have access to all default Ubuntu utilities.