This how-to explains you how to use SkipFish through a proxy. It will show you how you have to configure Burp Suite and which parameters you need to supply to SkipFish so that all SkipFish’s traffic will flow nicely through Burp Suite.
Introduction
What is SkipFish?
Skipfish is an active web application security reconnaissance tool. It prepares an interactive sitemap for the targeted site by carrying out a recursive crawl and dictionary-based probes. The resulting map is then annotated with the output from a number of active security checks. The final report generated by the tool is meant to serve as a foundation for professional web application security assessments.
Drawbacks of SkipFish
If you’re a fan of automating web application scans and using tools via the command line, then SkipFish is definitely a tool for you. However, the automated non-interactive way in which SkipFish is working presents some drawbacks which you might miss as an experienced web application tester. For example:
- When launching SkipFish, you can give session-cookies as a parameter so that you can test the web application through an authenticated session. However, SkipFish does not have the feature built-in to detect when it is out-of-session.
- When testing more advanced web applications which use changing CSRF tokens, then SKipFish cannot be trained where to look for an updated CSRF token.
These are of course not just drawbacks of SkipFish. Many other web application scanners (even the commercial ones) don’t support these features either.
There is however one great tool which does support this or which you can extend yourself: Burp Suite! Burp Suite is an integrated platform for performing security testing of web applications.
Since Burp Suite also is a proxy tool, it allows for other web application testing tools to send their requests through Burp Suite to benefit from Burp Suite’s advances features.
However SkipFish does not support the usage of a proxy server. At least it not that straightforward.
The next section will explain you how to use SkipFish through a proxy. It will show you how you have to configure Burp Suite and which parameters you need to supply to SkipFish so that all SkipFish’s traffic will flow nicely through Burp Suite.
Configuring SkipFish
When you launch SkipFish to scan a web application, then SkipFish will typically resolve the hostname of the web application you want to scan, so that requests can be send to the IP address of the web application.
But we don’t want SkipFish to send its requests directly to the web application, instead we want it to send its request to the Burp Suite Proxy. Fortunately, SkipFish contains a command-line parameter which you can use to define a custom mapping between a host and an IP address. The effect of this is that SkipFish does not resolve the hostname of the machine you’re testing, but it uses the IP address specified on the command line. Consider the following example:
The “-F” option tells SkipFish to send all requests destined for www.example.com to the IP address 192.168.200.50 and not the example.com’s real IP address.
This is the first step which will ensure that SkipFish will send its requests to the machine on which BurpSuite is running. Now we still need to configure the Burp Suite Proxy so that it will accept and process the requests send by SkipFish.
Configuring Burp Suite
The default settings of the Burp Suite Proxy need some modifications before it will accept and process requests send by SkipFish. The changes which need to happen are:
- Burp Suite listens by default only on the localhost interface for incoming proxy connections. This presents a problem if you are running SkipFish on different machine than the one on which Burp Suite is running.
- Burp Suite listens for incoming proxy connections on port 8080. It is important to understand that we are mimicking a web server. So if you want SkipFish to scan a regular HTTP web application, then your proxy should listen on port 80. For web applications on HTTPS ports, your proxy should listen on port 443.
- And last but not least, the proxy expects that incoming requests are formatted as “proxy-style” requests instead of regular HTTP requests. We’ll explain the difference in the next sections.
Regular versus proxy HTTP requests
A normal HTTP request sent from a browser to a website typically looks like:
Host: www.vanstechelman.eu
However, when a proxy must be used, then the browser sends the following request to the proxy:
As you can see, the “proxy-style” request also contains the entire hostname in the first line of the request. This is done to help the proxy since in that way, the proxy only needs to parse the first line of the request to know where the request needs to be proxied to.
Changing the Burp Suite Proxy configuration
All changes to the Burp Suite Proxy configuration will be made in the following tab (Proxy \ Options):
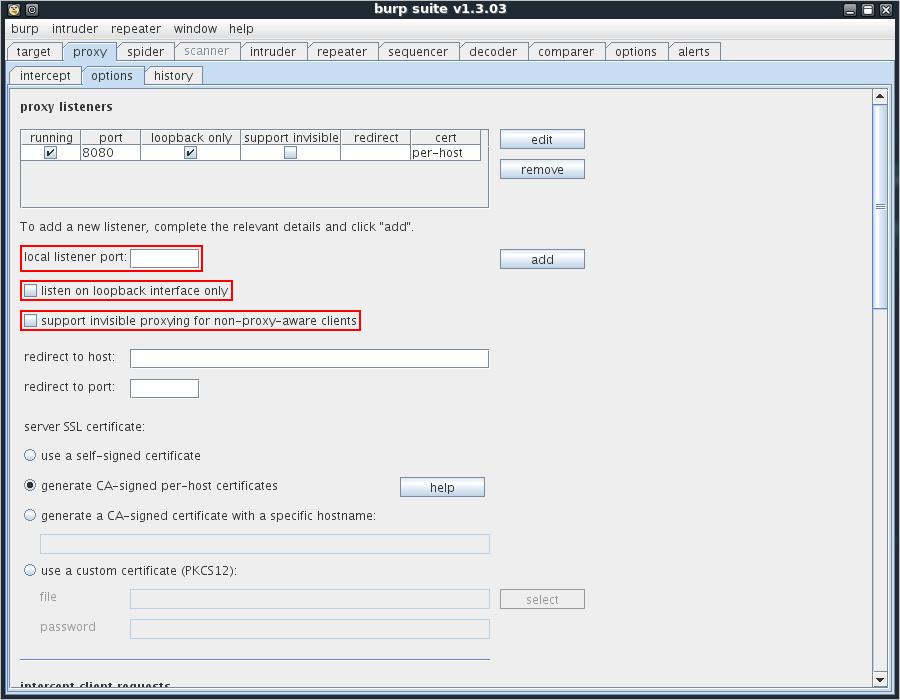
The options which will be changed have been highlighted.
Instructing Burp Suite to listen on other ports
Since the Burp Suite Proxy will be mimicking a real web server in our setup, it needs to listen on the same port as the web application you are testing.
- If you are testing http://www.example.com, then the proxy needs to listen on port 80.
- If you are testing https://www.example.com, then the proxy needs to listen on port 443.
- If you are testing http://www.example.com:8080, then the proxy needs to listen on port 8080.
To enable the Burp Suite Proxy to listen on a certain port, enter the port number in the “local listener port” field and click “add”.
Instructing Burp Suite to listen on all interface
If SkipFish is running on another machine than Burp Suite, then Burp Suite needs to listen on all network interfaces instead of only on the localhost. In order to do so, make sure that the option “listen on loopback interface only” is not checked for all applicable proxy listeners.
Instructing Burp Suite to accept non-proxy-style requests
To enable Burp Proxy to work with clients that send non-proxy-style requests, you need to check the "support invisible proxying" option. When you do this, if Burp Suite receives any non-proxy-style requests, it will parse out the contents of the Host header, and use that as the destination host for that request.
Final Burp Suite Proxy configuration
The following screenshot shows the proxy listener configuration on my system:
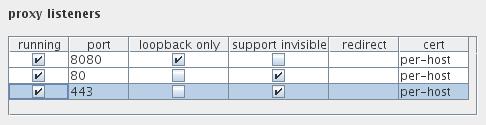
On my system I have the default proxy listener on port 8080 which only accepts connections coming from the localhost.
Next to that, I have two additional proxy listeners:
- One on port 80, to mimic regular non-encrypted websites
- One on port 443, to mimic https websites
Links
- SkipFish: http://code.google.com/p/skipfish/
- Burp Suite: http://portswigger.net/suite/
- Burp Suite Extender: extending Burp Suite’s functionality in Java: http://portswigger.net/burp/extender/